As you probably know, I think the Vitopod is about the best propagator you can get. It’s a masterpiece of British design, versatile and durable. You can use it for germination, bringing on seedlings and over-wintering tender plants. Accurate temperature control and you can vary the height to accommodate growing plants.
So, what is better than the Vitopod? Well that’s actually a trick question with 2 answers!
2 Vitopod Propagators!
The first and probably obvious answer is 2 Vitopods. When my greenhouse was destroyed in a storm, the Vitopod was in it and didn’t do well.
The heated base tray was fine but most of the transparent side panels and lids were smashed beyond repair even with two tubes of glue. So I replaced it, along with the greenhouse. I couldn’t throw away the base or the thermostat so they got stashed at the back of the shed.
I had thought that I might construct some sort of cover to go over the base but that was one of those things I hadn’t got around to. Anyway, I took a mooch around the Greenhouse Sensations web site (the manufacturers of the Vitopod) and popped ‘Vitopod Spares’ in the search box. I discovered you can buy the layers, lids, in fact all the bits separately.
So, no more ado I was adding to the basket and a new Vitopod arose from the remains of the old!
Geopod Propagator
Now you might recall that this year I got a Geopod which is a heated propagator with lights. I’ve been really impressed with the results, better growth and sturdier plants despite being really early in the season with short daylength and low light levels in the day anyway.
It’s very hard to see light levels, our eyes adjust automatically but an old-style camera light meter will show it up and it’s very obvious in the amount of electricity our solar panels generate. The stronger the light, the more energy that plants have to convert nutrients into plant.
Once I calculated the running cost of the grow lights (not a lot!), especially taking into account that the energy the lights use reduces the electricity for heating, I was sold on the concept. Bringing on early tomatoes and peppers for greenhouse and polytunnel is so much easier with horticultural lighting.
Vitopod with Grow Lights
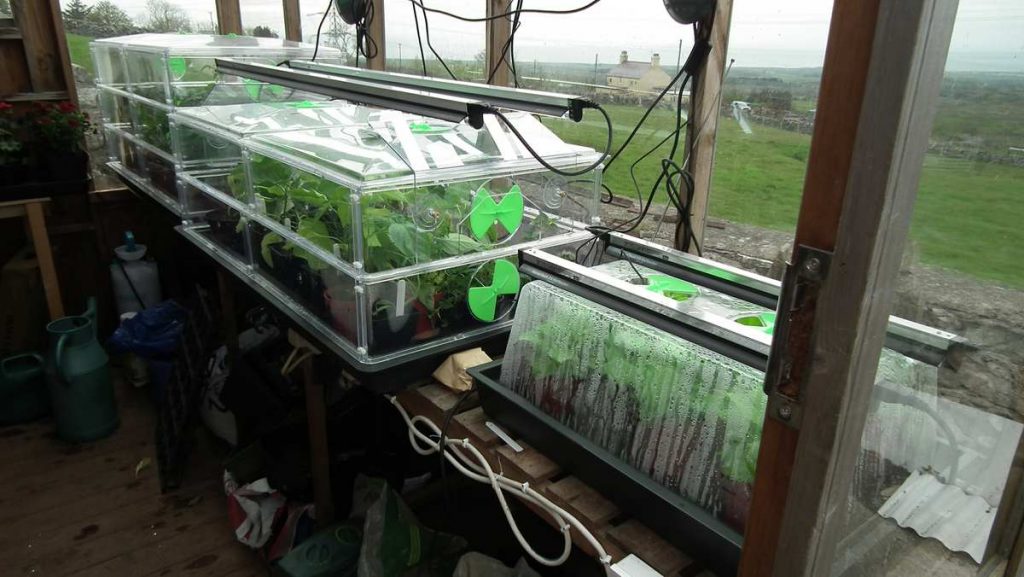
Then I discovered that Greenhouse Sensations were ahead of me and have developed a support bracket that fixes onto the side of the propagator. So if you’ve already got a Vitopod you can upgrade it with a lighting kit.
Like many great ideas, it’s really simple. The shaped perspex (or whatever the material is) bracket that holds the lights is connected to 2 suckers that hold on the side. I was a little concerned about the suckers coming loose but they’re rock solid. If you don’t get them perfectly level, no problem – just adjust the fixing screws.
Current Propagation System
So my current system for the greenhouse crops is to germinate in the Geopod and then bring the seedlings on with lighting until they go into the 2 tier Vitopod with lights. Once they’re too tall for that they go into the 3 tier Vitopod until I’m ready to plant out.
Things are a bit crowded at the moment because we’ve had a spell of cold weather and I didn’t want to shock the plants by planting out in cold but they’ll be going out soon. And soon it will be time to pack the propagators away except for one Vitopod which will be used to over-winter some of Val’s decorative plants.
You can buy the Vitopod lighting kits and Vitopods direct from Greenhouse Sensations or through Harrod Horticulture who are currently offering us 10% discount using voucher code JHTEN


Hi, for how many hours do you have the vitopod lights switched on ? Thnx.
Depends – I aim to provide daylight for 12 hours so maybe 3 in the morning and three late afternoon. On a very dull day, might be on for 12 hours straight.
Thanks. Also, any tips on how to suspend the thermostat/temperature cable ? I thread it through the hole between the base and sides, is it ok to rest the tip on something, or does it need to be not touching anything ?
There’s a little notch on the base of mine where I feed the cable through. I then put the tip that senses the temperature into the soil in the pot or tray. This means it is now measuring the temperature of the soil (compost)rather than air temperature.
Don’t leave the tip lying on the base as it will heat / cool too frequently and not give an accurate temperature of the contents of the propagator.