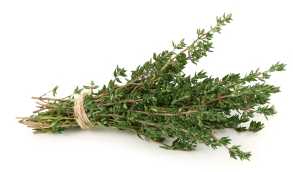
Drying Herbs – Rosemary
Drying herbs is really quite easy and doesn’t require a drying cabinet or machine. Drying does tend to concentrate the flavour and for some recipes dried herbs are actually preferable to fresh. They’re certainly convenient, we keep ours in the cupboard by the stove where they are always handy to add to the pot whilst cooking.
Herbs intended for drying should be gathered on a warm dry day, not after rain, and before the sun has warmed the leaves and begun evaporating the essential oils. Pick them just before they come into flower as, after flowering, the leaves start to toughen up.
Process one variety or type of herb at a time and then remove any dead or withered leaves. Tie them into small bunches with thin string or cotton. Blanch very quickly by dropping into boiling water for no more than five seconds.
Blanching does seem to help speed the drying process, but we’ve successfully dried herbs without blanching so feel free to omit this step if you’re pressed for time.
However it is a good idea to give your herbs a rinse under running water to clean off any dust etc. before drying if you’re not blanching. Shake off the excess water and then pat dry with a towel or kitchen paper.
Air Drying Herbs:
There are number of factors that will affect the time to thoroughly dry your herbs. Temperature is obviously important, they will dry faster in the warmth. However, you don’t want to over-heat them. Gentle warmth such as that found in an airing cupboard or over a heating boiler or cooker is sufficient. Of course, you can use a commercial dryer or home made drying cabinet as long as the heat is gentle.
Airflow is also very important for drying herbs, you don’t need a fan but you do need somewhere where the air is circulating.
Humidity is the final thing to watch for, especially when drying in a kitchen. Your herbs will never dry properly in a damp atmosphere. We hang ours in the kitchen near the stove, which has an extractor for steam when we’re cooking.
You don’t want your herbs covered in house dust so lightly wrap in some muslin or other loose weaved light fabric like cheesecloth to protect them whilst drying. It can take anything from a few hours to a couple of weeks to thoroughly dry, depending on the herb and the conditions. You will know they are properly dry when the main stems of the herbs crack, rather than bend, and the leaves are brittle.
Microwave Drying Herbs:
If you are in a hurry or do not have anywhere to air dry them, then you can dry herbs in your microwave. This is a simple and easy process but you do need to pay careful attention over what you are doing. Lay two sheets of absorbent kitchen roll paper and then put a layer of herbs down, then another layer of paper towel. Use the microwave on high for 1minute and then in bursts of 30 seconds, moving the herbs around and checking dryness frequently.
Allow time between each burst of microwaves and do not over-heat them. The whole process should take no longer than 5 minutes with spaces between each burst of heating.
Oven Drying Herbs:
Herbs can also be dried in a conventional oven so long as it can be run at a cool enough temperature. Sometimes you may find you need to run the oven with the door slightly open to keep the temperature from rising too high.
If so, never leave unattended especially if there are curious children or pets around.
The correct temperature ranges between 45°C/110°F/Gas Mark 0 and 55°C/130°F/Gas Mark 0. Ideally place on wire mesh racks in the centre of the oven and turn a few times to ensure even drying.
The herbs should be dried until they are crisp. If the drying process is continuous, this takes about 1 hour (on a rack above the stove it will take 3-4 hours).
Storing Dried Herbs:
Once dry you can hang them in decorative but useful bunches in the kitchen to pick from as required. It is more practical though to strip leaves from the stems and then crush the herbs with a rolling pin, discarding any stalks. If you want to reduce them to a fine powder, sieve them.
They will store well (so long as they are thoroughly dry) in small airtight containers, well-filled to preserve the fragrance. If stored in glass bottles, protect them from the light to conserve the colour or look for brown glass bottles. If the herbs are not very well dried when stored this way, they will develop mold. Otherwise they will store well for a year or even a couple of years in jars.
Bouquets Garnis:

Bouquet Garnis – Bundle of Dried Herbs
Is a term frequently referred to in cookery recipes and consists of a bunch of herbs – usually a twig of bay leaf, sprig of parsley, sprig of thyme and sprig of rosemary, tied together and used in soups and casseroles.
It is useful to prepare some of these and dry them so they are ready for instant use. The bouquet garni is removed from the cooked dish before serving.
More on Drying & Dehydration
- Drying Apples & Pears – How to Dry Apples & Pears
- Drying Apricots, Peaches, Plums – How to Dry Apricots etc.
- Drying Fruits – How to Dry and Store Fruits, Fruit Leather
- Drying Runner & French Beans – How to Dry Runner & French Beans
- Drying Herbs – How to Dry and Store Herbs
- Drying Vegetables – How to Dry and Store Vegetables
- Sun Dried Tomatoes – How to Dry Tomatoes
- Drying Beans & Peas – How to Dry Beans & Peas at Home
- Drying Onions – How to Dry Onions


