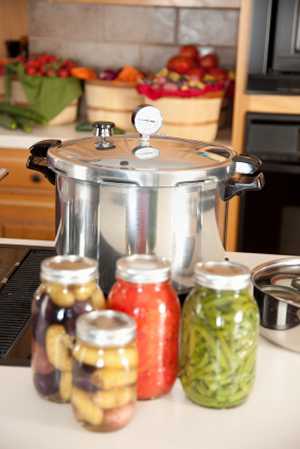
Bottling under pressure is the most energy efficient method as raising the pressure increases the boiling point of water and thereby the temperature that the food is processed at, so reducing the amount of time taken.

Pressure Bottler Canner
Purpose made pressure canners were difficult to find in Britain, when we first wrote How to Store Your Home Grown Produce we only found one very expensive model, but they are becoming more easily available and at much lower prices imported from the USA.
Pressure canners have a much larger capacity than pressure cookers, which probably accounts for the price difference. The drawback of pressure bottling is that you are limited to how many jars you can fit in your pressure cooker at one time which is where the purpose made canners score.
For bottling vegetables with low acid content, pressure bottling is the only safe route as the botulism bacterium can survive boiling water. The higher boiling point temperature for the period given guarantees the bacteria are dead.
The method is simple enough. Pack the fruit or vegetables into hot jars and then fill with boiling syrup or brine for vegetables. Loosely fix the lids onto the jars. Whilst filling your jars, heat about 11/2 pints (850ml) of water in the pressure cooker to near boiling and then place your jars in, ensuring they are sitting on a trivet so not subjected to direct heat and not touching each other.
Place the lid on the cooker and bring to operating temperature. For high acid fruits, cook on the L weight setting, 5lbs but low acid vegetables must be processed on the M weight setting, 10lbs.
Different cookers have different methods so check your manual. With ours we allow the steam to escape for 5 minutes before placing the weights on but more modern ones have this purging automatically handled by the safety release valve.
Cook for the time given at pressure and then remove from the heat. Allow the cooker to cool naturally, don’t pour cold water over it to hurry the process. Once cool enough to have reduced the pressure inside, you can remove the lid and take the bottles out onto a cooling rack. Tighten the seals if necessary.
Warning, if you’re not used to pressure cooking double check the pressure has abated by gently lifting the weights. On our old model it is possible to unlock the lid whilst at pressure. The effect would literally be a small explosion of super-heated steam and water which could have awful results.
Double check the seals on the jars of processed fruit the next day.
Elevation
Water boils at different temperatures according to the air pressure. This is a problem often encountered by mountaineers, they can boil water at a low temperature so they can’t actually cook things or get a decent cup of tea in the rarefied low pressure air.
If you happen to live at high level, then you need to take this into account when bottling. The list below gives compensation timings and pressures for different elevations above sea level.
For pressure bottling add ½ lb pressure per 1,000 feet, 300M. If bottling vegetables and you cannot control the pressure accurately, use the H, 15lbs weight setting to be safe.
Timing Chart for Pressure Bottling Fruit
Time begins once pressure (L or 5lbs) has been attained and the heat has been reduced to prevent over-steaming.
| Fruit | Time (mins) |
|---|---|
| Apples – in Syrup | 1 |
| Apples – Solid Pack | 3-4 |
| Apricots | 1 |
| Blackberries / Loganberries / Raspberries | 1 |
| Cherries | 1 |
| Citrus Fruits – Orange, Lemon, Grapefruit etc in syrup | 1 |
| Currants – Black, Red or White | 1 |
| Gooseberries – for cooking in pies etc | 1 |
| Gooseberries – for uncooked use in desserts | 1 |
| Peaches | 3-4 |
| Pears | 5 |
| Pineapple | 3 |
| Plums and Damsons | 2 |
| Rhubarb – for cooking in pies etc | 1 |
| Rhubarb – for uncooked use in desserts | 1 |
| Strawberries | 3-4 |
| Tomatoes – Solid pack | 15 |
| Tomatoes – in Brine | 5 |
Timing Chart for Pressure Bottling Vegetables
Time begins once pressure (M or 10lbs) has been attained and the heat has been reduced to prevent over-steaming.
| Vegetable – |
Blanching Time (mins) |
Time at Pressure (mins) |
|---|---|---|
| Asparagus | 2-3 | 35 |
| Broad (Fava) Beans | 3 | 40 |
| French & Runner Beans | 3 | 35 |
| Peas | 2 | 45 |
| Sweet Peppers | 3-5 | 40 |
| Sweetcorn (Blanch on the cob) | 6 | 50 |
| Low Acid Tomatoes – Solid pack | N/A | 25 |
| Low Acid Tomatoes – in Brine | N/A | 20 |
Instructions for Bottling Brine for Tomatoes & Bottling Syrup are here
Instructions for checking the bottle seal
Safety of Bottled Food
One obvious risk is the seal breaking and allowing microbes access to the food. These will develop and produce gas, often leading to an increase in pressure. With commercial canned goods where the tin has been damaged, a sure sign the contents are spoiled is the can swelling. In the grocery trade, they’re known as ‘blown’.
If you open a home bottled jar and there’s a release of pressure, the food is spoiled. Usually the obnoxious smell will make this very obvious but please don’t trust the food even if it smells OK.
More On Bottling (Canning)
- Bottling or Home Canning Your Produce – Introduction, History, Safety Tips
- Equipment for Home Bottling / Canning
- Methods of Home Bottling / Canning
- Bottling or Home Canning – Preparation of Fruit and Vegetables
- Oven Dry Pack Bottling (Canning) Method
- Oven Wet Pack Bottling (Canning) Method
- Slow Water Bath Bottling (Canning) Method
- Fast Water Bath Bottling (Canning) Method


