This traditional method of growing tomatoes in straw bales and other tender plants like peppers and cucumbers is a great way to produce an early crop in our uncertain climate. Basically the straw bale is being composted and the heat from that process encourages the plant growth. Outdoors the method can also be useful for pumpkins and squashes, courgettes and marrows.

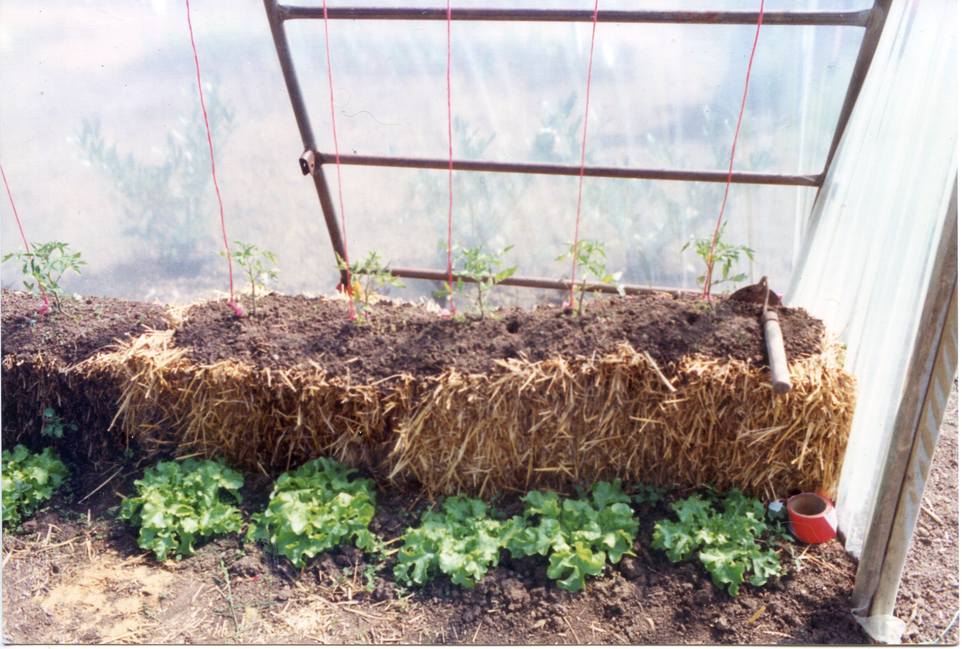
Growing Tomatoes in Straw Bales in a Polytunnel (Note lettuce planted close to the bales, shaded from strong sun)
The straw bale method can be used to good effect in an unheated greenhouse, a polytunnel or for growing outdoors. It’s also useful for growing tomatoes outdoors where the soil is thin and poor or even on a patio or paved yard.
At the end of the growing season the straw bale should have decomposed enough to be put on the compost heap or mulched.
Finding Straw Bales for Growing Tomatoes
The big problem nowadays is actually getting hold of suitable straw bales. Most large arable farmers produce straw which is rolled into huge cylindrical bales for mechanized handling rather than the traditional bale around 20Kg to 30Kg that a man can lift (with care).
The other problem is that the crop may have been treated with a selective weed killer and the residue of this will kill your tomatoes.
Ask around at stables, farm markets etc. and you should be able to find a farmer who will sell you a few bales but do ask about what chemicals have been used if he’s not an organic farmer.
The ideal is wheat straw, although barley or oat straw can be used. An alternative that may be easier to find is hay bales but hay tends to contain weed seeds that may germinate and become a problem. Hay isn’t really ideal because of its structure either but if you cannot find suitable straw bales then it is an option.
Preparing the Straw Bales
If possible, dig a shallow trench the same size as the bales and line with polythene to retain water in the bale or just sit on polythene as a second choice.
Place the bales in position with the straw sitting vertically as this helps it to absorb the fertiliser we’re going to be adding. First of all wet the bale thoroughly using a fine rose on your watering can with a nitrogen rich solution.
Traditionally and organically this was urine mixed 1:5 with water. This may be somewhat unpleasant but urine is sterile when produced and doesn’t present a health hazard. You’ll also need quite a lot which can be a problem.
Another method is to wet the bale and then sprinkle with 500gr to 750gr of nitro-chalk fertiliser and water in, repeating this some 3 or 4 days later. An organic equivalent of nitro-chalk would be to use double that amount of dried blood.
Both the methods above are relatively slow, taking around three weeks to get the bale ready to plant. In the days when some commercial glasshouse tomato growers used straw bales they worked with a faster method said to take 7 to 10 days.
Thoroughly wet the bale and then sprinkle with a mix of:
- 500gr nitro-chalk
- 450gr Superphosphate
- 350gr Potassium Nitrate
- 150gr Magnesium Sulphate (Epsom Salts)
- 75gr Ferrous Sulphate (Sulphate of Iron)
Thoroughly water in the above mix. You’ll still need to feed as you grow but it provides a good basic environment for tomatoes.
Keep the bale damp, if it dries out it will stop the composting process. After a few days to a week the straw should begin to warm up due to the microbial action. It will also be giving off CO2 which is a benefit to plant growth in a greenhouse or tunnel. The warmer the environment, the faster fermentation will start and run.
Ideally you need a compost thermometer with a long probe to measure the temperature inside the bale although the old timers relied on touch and experience. It should rise to at least 43ºC, often getting up to 54ºC.
Check the temperature every day or two, it will rise to the peak and then start to fall. When it drops from the peak temperature to below 38ºC you’re ready to start planting.
Planting in Straw Bales
Start by making a hole in the top of the bale and putting a couple of handfuls of compost in. Plant tomatoes deeply, they have tiny hairs on their stems called adventitious roots, which is the start of root formation. Planting deeply means the plants will produce more roots which will help to improve the plant’s root structure and enable it to take in more nutrients.
It’s important to remember the benefit of the straw bale method is primarily the warmth around the base of the plant and that the straw does not provide any nutrients. You must feed regularly – I’d suggest twice a week – with a high potash fertiliser. Either proprietary tomato feed like Tomorite or Chempak or organic feed like comfrey tea or sheep’s manure tea.
At the end of the season the straw bale can go onto the compost heap – cut the twine to allow the straw to spread and mix with grass cuttings for best results.
Further Information: Tomato Growing Guides
- Grow Unusual Tomatoes!
- Types of Tomatoes – An Introduction to Tomato Growing Part 1
- Sowing and Starting off Tomatoes – Introduction to Tomato Growing Part 2
- Growing Tomatoes in a Tomato Grow-house (Mini-Greenhouse)
- Growing Tomatoes in a Greenhouse
- Growing Tomatoes in the Greenhouse Border
- Growing Tomatoes in Pots or Grow Bags in the Greenhouse
- Growing Tomatoes by Ring Culture
- Growing Tomatoes in Straw Bales
- Growing Tomatoes Outdoors
- Planting & Growing Tomatoes Outdoors
- Growing Patio Tomatoes – Dwarf Bush Variety Patio Tomatoes
- Water Requirements for Tomatoes
- Ideal Temperatures for Growing Tomatoes
- Removing Tomato Side Shoots (Suckers) & Stopping Tomatoes
- Best Tomato Varieties – My Top Tasty Tomato Picks
- Heirloom Tomatoes (Heritage Tomatoes)
- Best Tomatoes for Greenhouse Growing
- Tomato Troubles & Diseases | Causes & Cures of Tomato Problems
- Raising Tomato Plants from Seed


