Or build a cold frame at home for next to nothing anyway!
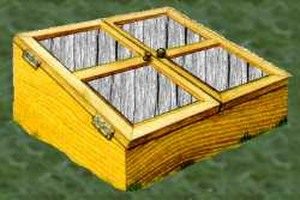
I’ve built coldframes in the past but sadly left them behind when we left the UK for a while. They really aren’t difficult to construct, even if you are not very good at DIY (I’m rubbish!) If you can get some old pallets or scrap wood the cost will merely be that of a few screws and nails

Home Made Cold Frame
The sides are made of wood, making a coldframe with glass sides is beyond my abilities.
The hardest part would be to make the opening lights but there is an easy way around that. Keep an eye out for somebody having double glazing installed or ring a windows company and ask them. They often tell you when you explain what you’re after. The window installers will break the fixed panes of the old windows as part of the removal process but if you ask nicely, perhaps offer a couple of pounds, they’ll give you some opening lights.
The size will vary but typically you are looking around 2’6″ by 18″. 2 of these will give you a rather good 7.5 square feet of sheltered growing space.
The lights (as we call the glass panes) usually slope from the back to the front. This helps water to run off and, if the coldframe is placed facing south, increases the sunlight reaching the inside. That’s why solar panels are placed at an angle. The actual angle isn’t too important.
I made mine from 6″ X 3/4″ planks and some 2″ x 1″ for the corners. You could make one from old pallet wood or scrap even. I’ll assume you are using 6″ wide planks for this coldframe build.
Cutting the Wood for the Cold Frame
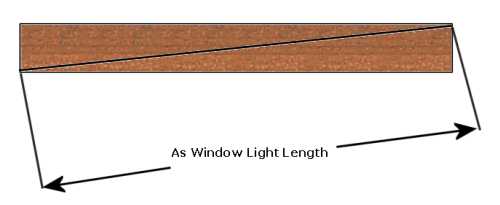
The first pieces to cut are the angled top pieces. Measure the length of the window and then draw a line from a top corner to opposite bottom corner of the plank that length. Cut along this, using a jigsaw is easiest. Now cut 2 planks the same length as the flat edge of those planks and another 3 the same as the 2 lights together, less the thickness of the planks (just under 2″ – check this).
Cut 2 pieces of 2″x1″ 6″ high for the front internal corners and 2 pieces about 11″ high for the rear.
Cutting the angled side pieces from one length of wood

Building the Cold Frame
Now screw the base together fixing into the 2″x1″ corner pieces. Fix the side pieces and back. For extra strength, use some wood glue between the sloping sides and back to the base and pin (thin nails about 2″ long) at the front of the sloping side into the base and from the sides directly into front and rear. This sounds trickier than it is. Honestly, this is easier to do than explain.
If you want this to last, then paint with a wood preservative. Fix the window lights to the side and the job is done. You can use a piece of wood to hold the windows open.
Insulate the Cold Frame
You can increase the effectiveness of your coldframe by insulating it. Polystyrene tiles or a wallpaper roll of polystyrene stuck to the inside will hold heat well and the white colour will reflect light onto the seedlings within
Greenhouse Growing, Coldframes etc. Further information
- Best Position for a Greenhouse – Where to Site a Greenhouse
- Greenhouse Capillary Matting: A Comprehensive Overview
- Understanding Greenhouse Planning Permission: What You Need to Know
- Wooden Greenhouses Compared to Aluminium
- Greenhouse Heating Guide – Various Types Reviewed
- Second Hand Greenhouse – Buying, Dismantling and Re-building a Greenhouse
- Greenhouses in High Winds – Protect and Survive!
- Greenhouse Accessories for Heating and Ventilation
- Fitting out the Greenhouse: Shelving, Staging & Greenhouse Benches
- Watering the Greenhouse – Equipment to Help Greenhouse Watering
- Portable Greenhouses – Patio Greenhouses and Allotment Greenhouses
- Managing the Hobby Greenhouse
- Cold Frames – Uses of Coldframes – Types of Coldframe
- How to Build a Cold Frame for Free!
- An Indoor Greenhouse – The Dewpoint Propagating & Growing Cabinet
- Choosing a Greenhouse – What Greenhouse to Buy


