John Trim
This is part 2 of a 3 part series of articles, growing potatoes for show – cultivation of show potatoes, on growing prize winning potatoes for the show bench by John Trim, Fellow of the National Vegetable Society, show judge and horticultural lecturer.
- Growing Potatoes for Show, Introduction & Best Varieties
- Growing Potatoes for Show, Cultivation of Show Potatoes
- Growing Potatoes for Show Harvest & Showing Potatoes
Once you have obtained your seed potatoes sort through them and select tubers the size of a large hens egg. Give them a wash under running cold water and examine for common scab or any other skin disease. Only select the best to grow on for show. The others will not be wasted, use them to raise your eating crop.
Chitting Your Show Potatoes
Once sorted and cleaned set the tubers out in an egg box with the eyes uppermost. They will need plenty of light and a cool but frost free area to develop strong stubby shoots. 4°C is ideal.
Potatoes are a top rated exhibition vegetable which means they are awarded the maximum of 20 points. This reflects the difficulty of growing show potatoes. Possibly the hardest thing to attain when growing the potatoes is a perfect skin condition coupled with the optimum shape and size. So it stands to reason that the compost they will grow in is of prime importance.
The Compost Mix for Show Potatoes
To every 100 litres of Sphagnum moss peat add 500 grams of Vitax Q4 and 500 grams of calcified seaweed. Then pass the whole lot through a shredder to break down any lumps in the peat.
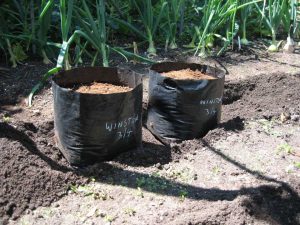
This amount will be enough to fill 5 x 17 litre poly-bags. I prepare the compost a month before it is required, usually late February. Once mixed the compost is then returned to the original peat sacks to which is added one gallon of water. Tie the necks of the sacks and store them in a shed until required.
Sowing Seed Potatoes
Seed sowing begins in early April. Fill each poly-bag a quarter full then put one tuber in the bag, ‘with eyes uppermost’, add more compost to fill the bag to the top. Before sowing reduce the eyes on each tuber down to two shoots. This will give you fewer but larger potatoes at harvest. Gouge the eyes out quite deeply using a teaspoon.
I prefer to leave a couple of the shoulder shoots and completely remove the rose cluster at the top of the potato. If you leave the rose cluster I believe it throws up too many small potatoes which is not what we are looking for in an exhibition dish.
Setting the Potatoes out.
Take out shallow trench about 100mm deep, a cultivator is ideal for this job especially if you have a lot to do. Broadcast a handful of potato fertiliser per meter run along the trench and hoe in. Give a good scattering of slug pellets and place the bags along the trench allowing a 3” gap between each bag. Draw back the soil around the bags and give a good watering.
From then on it is preferable to rely on natural rainfall to water the compost or used saved rainwater. The problem with most water from the tap is it’s high alkaline content, very often over 7 on the Ph scale. A high Ph could create the conditions to encourage common scab. A Ph range of 4.5 to 5.5 is ideal therefore it is best to avoid tap water if at all possible.
During the growing period give a fortnightly foliar feed with ‘Maxicrop.’ This feed is high in potash an essential element in the development of the tubers. Under these ideal conditions the haulms will grow strong and tall and they will need some support to keep them off the ground.
An indication that tubers are forming is when the plants come into flower. This is when the developing tubers will need moisture the most.


