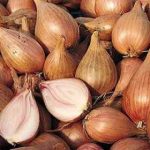
Shallots are prized by cooks for their mild, sweet flavour yet they can be hard to find in the shops. Luckily they are one of the easier members of the onion family to grow and they store better than onions. 9 months is usual and even 18 months is achievable. Because they store so well you can bridge the gap between your stored onions going over and the first onions of the new season being harvested.
 Types of Shallots
There are basically 3 types of shallot; yellows, reds and the French Jersey types which are more elongated in shape. Unlike the other types some of the French varieties don’t store as well so check your supplier’s catalogue or ask them if it’s not clear.
My favourite varieties are: French Jermor which has won the prestigious RHS Award of Garden Merit; Red Sun, a more globe shaped bulb with a lovely red skin and white flesh. Golden Gourmet is also well worth growing, being resistant to bolting and producing large bulbs that store well.
Shallot Seeds or Sets?
You can grow shallots from seed but normally they’re grown from sets, which are far easier. The quality of the sets will have an effect on the crop – stick with reputable suppliers for the best results.
pH & Fertiliser for Shallots
Like all onions, they like a rich soil in a sunny spot but they don’t like too acid a soil so test the pH and lime if below 6.5 pH a couple of months before planting. I always add a good handful, about 100 grams in metric, of fish, blood and bone general fertiliser per square metre raked into the soil a week before planting to carry them through.
Shallot Problems
The biggest problem I’ve had with shallots has been the birds pulling out the sets the day after planting so cover with netting, fleece or cloche until they’re established. Otherwise fairly trouble free but check out Onion Pests & Problems
Crop Rotation
In the past it was the practice to have a permanent onion bed where the shallots and onions were grown year after year. However, we now know this encourages the build up of soil borne pests and diseases as well as depletion of micro nutrients in the soil. Rotating the crop to a different spot each year, ideally over 4 years, will help to prevent problems developing and keep yields up.

Planting Shallots – Anytime between December and March depending on the weather.
Dib or scrape a hole and plant so just the tip shows. Firm the soil

Shallots Growing – Spaced around 20-25cm apart
Shallots Ready to Harvest
Once the leaves fold lift gently with a fork and then ease the individual bulbs apart

Shallots Drying prior to storing indoors
Preparing the Soil
Prepare the soil by adding some general purpose fertiliser a week or so before planting out. Shallots are very hardy and can go out anytime from the end of December through March.
Plant firmly to half their depth spaced about 20 to 25cms apart each way in a sunny patch. Protect from birds with netting, fleece or cloche until established.
Cultivating Shallots
Shallots don’t need a great deal of attention. Just keep them fairly weed free as they are easily swamped, especially in early spring before they’re fully established.
In dry weather do keep them watered which will help the bulbs to swell but avoid over watering as they reach maturity or they’ll not be as firm and won’t store so well.
Harvesting Shallots
Each set planted will develop into a bunch of 6 or 8 new shallots in a ring. You can often get even more, 20 being about the most I’ve heard of.
By mid-summer, somewhat earlier than maincrop onions, the foliage will start to go over and they are ready to harvest. Just loosen with a fork before lifting if necessary.
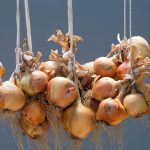
Drying off and Storing Shallots
Once lifted, dry them off for a week on a rack in a sunny and preferably dry place before storing.
If it’s rainy weather, be careful about drying off in a greenhouse. You can end up with cooked shallots!
Tie in bunches or store in netting in a cool dry place and they should easily keep well for 9 months to a year. We’ve had good shallots after 18 months at times.
Further Information on Growing Shallots
Harvesting and Storing Onions & Shallots
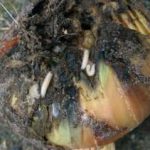
Onion Pests, Diseases & Problems