My Merry Tiller Rotavator
One of the most useful machines for the allotment or produce gardener is a rotovator and the Merry Tiller is almost legendary. The original Merry Tiller was a US machine made under licence by Wolseley Webb Ltd in Birmingham but I believe they ceased manufacturing them in the early 1980s
The brand name of Merry Tiller seems to have been resurrected but I don’t know how they compare with the original in terms of solid construction. Looking at most ‘modern’ cultivators, they seem almost flimsy in comparison.
My Merry Tiller came in 2 models:
- The Merry Tiller Major with a 4hp Briggs and Stratton engine, fixed or adjustable handles
- The Merry Tiller Super Major with a 5hp Briggs and Stratton engine and adjustable handles.
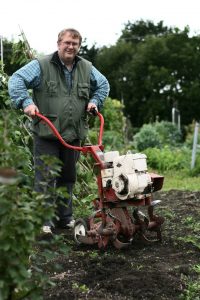
My model is the Merry Tiller Major with adjustable handles.
I’m not 100% how old it is but the manual says ‘Late 1976 Onwards’ It is in very good condition except the engine could do with a service.
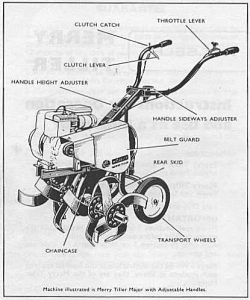 It was built in the days when British engineering was still equated with quality and things were built to last. Nowadays so much is made in China and designed to the minimum standard needed. (Grumpy old man mode)
Using The Merry Tiller
It’s definitely a skill getting the Merry Tiller to do the work, which comes with practice. The machine comes with wheels, which are used to transport it to the work area.
Once there, remove the wheels (the bar is held with a split pin) and drop the depth bar rear skid to around the level you want.
Safety
It’s pretty obvious that you are using a powerful machine with rotating tines that could do you some harm. Always wear sturdy boots – I would not rotovate in wellies myself. You make your choice according to how you value your toes!
The Merry Tiller does require some strength to handle at first. Once you have the knack, it does the work. So if you can trundle it around on its wheels then you can rotovate your soil, in my opinion.
Soil Condition
Soil condition is important – too wet and it will stick to the machine, in worst cases it gets stuck in the mud. Too dry on a clay soil will result in the Merry Tiller bouncing off the surface and charging along but not working the soil.
Sometimes, with heavy and solid soils, it can pay to turn the soil roughly with a spade or at least a patch to allow the Merry Tiller to get started.
Speed
The throttle controls the speed of the Merry Tiller and it often pays to go slower rather than faster. It is more controllable at slow speeds.
Depth
The depth bar is easily adjusted. It is best to go around three or more times, slightly deeper each time, than trying to go a foot down on the first go.
Once you are down to the depth you want, you can go over again at higher speed to really break up the soil. This is where the adjustable handles come in.
Adjustable Handles (Merry Tiller Super Major as standard, optional on the Merry Tiller Major)
First you can adjust the height to be the most comfortable for your height I found this really helped me in handling the machine.
Second, you can swing the control arms sideways so you can rotovate the ground without leaving your footsteps in the ground. The machine is harder to handle with the arms to the side so I only do this for one last go after the soil is well cultivated.
Merry Tiller Manual
I have been asked a few times about my Merry Tiller and have turned the manual that came with it into a pdf file. This comes with an excellent section on operating the Merry Tiller that I copy below. You can find the whole document here: Merry Tiller Manual PDF (413KB)
I would suggest you save it on your hard drive for future reference.
Working With the Merry Tiller
Ideally, when the machine is at its required working depth, then the operators position in relation to the machine should be such that the arms are almost straight and the body virtually upright.
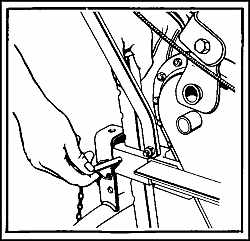
Merry Tiller Adjusting Rear Skid
Whilst there is no setting position in relation to the rear skid to give a set depth it should be set so that the length of the skid below the centre line of the machine is approximately the depth required. On machines with Adjustable Handles further adjustment can be made on the handles for comfort in operation.
Start the engine and set it at half throttle. Push the rear skid into the ground and slowly raise the clutch lever when the rotors will turn. Press down on the handles until the machine has dug to the depth required and then apply only sufficient pressure to the handles to maintain that depth. To dig more deeply apply more pressure to the handles and release pressure to dig less deeply.
FURTHER OPERATING SUGGESTIONS
To control the depth of tilling, the Merry Tiller must be operated with both the proper throttle speed and correct up and down pressure on the handles.
Raising up means going forward, as by so doing the skid bar is allowed to come out of the ground and the machine moves forward. Pushing down means slowing the machine as the skid is pushed further into the soil, at the same time the machine will dig deeper. When you are first learning to use your Merry Tiller it is not unlikely that it will tend to buck or move from side to side. This tendency will soon be overcome with use.
To acquire the knack of letting the machine do the work without effort on the part of the operator, we offer the following suggestions.
- Concentrate on keeping your arms relaxed.
- When working across a slope turn the front of the machine slightly uphill to combat any tendency for the machine to run downhill.
- For best results operate at reduced throttle settings when the ground is very hard or rough.
- Do not hurry the job proceed at a slow walk thus giving the machine time to do its work.
- It is advisable to re adjust the height of the rear skid to maintain the correct height of the handles, after the tiller has dug down to its required depth.
- The rear wheels may be used to steady the machine in work but should never be used as a depth control.
- It is better to release the clutch and go over the ground again if the machine starts to run away, rather than straining to hold it back which should not be necessary.
- Cultivate only when it is suitable to do so. Frozen or waterlogged ground, if cultivated, can cause poor soil moisture movement.
- Cultivate at a different depth each season to stop the possibility of ‘panning’ in the sub soil.
Spares and Accessories for Merry Tiller
With these machines being quite old, finding spare parts and accessories can be difficult. Many garden machinery repair shops can make drive belts to size so this vital part is rarely a problem. Ebay and Gumtree can be good sources for accessories but often prices can be high if a few people are bidding.
There’s a good web site offering Merry Tillers, Merry Tiller parts and accessories here.

