This is my experience of buying a second hand greenhouse and re-building it. I’m passing on the lessons I learned along the way with 2 second hand greenhouses
Why Buy a Second Hand Greenhouse?
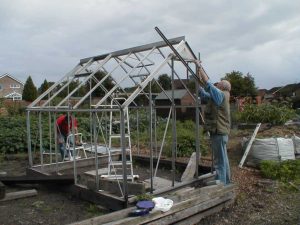
Building the greenhouse is usually a two person (at least) job. Fix the frame to the base and then glaze. Put the glass into the roof before the sides
A large good quality greenhouse can cost anything from £800 to well over £2,000, which can make a substantial dent in anyone’s budget. So, having decided that I really wanted a greenhouse, I scoured the local papers “for sale” columns.
There were quite a few smaller greenhouses, many of them free to a good home, but you can never have too much of a good thing, so go for as large a size as you can fit in. One solution is to pick up two smaller greenhouses and link them end to end to form one large greenhouse.
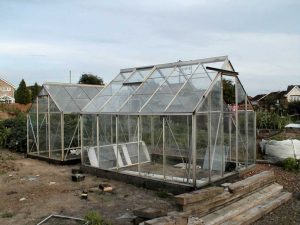
My first second hand greenhouse was a ten by eight, dissembled ready to load for just £50.00. I was away at the time, so my wife and daughter kindly bought it and transported it to the plot. For all sorts of reasons, I didn’t get ready to put it up for nine months but eventually I was ready to build it.
First Build a Base for the Greenhouse
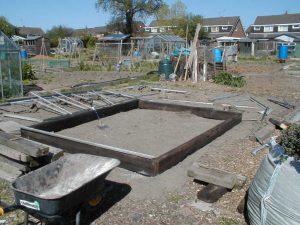
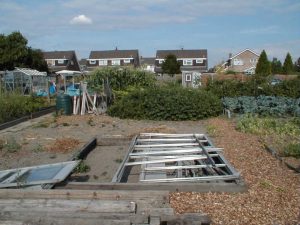
The first job is to build a base to support the house. You need a clear site, not under a tree or shaded by a hedge with enough room to get all the way around the greenhouse. See where to put a greenhouse Then your base, which can be wood, concrete, brick or similar needs to be the right size obviously, stable, square and level.
Just a tip on this, to ensure the base is square and not a trapezium, you need to measure across the diagonals. If the sides are equal and the diagonals are equal then the base is square. Double check the level with a decent three-foot spirit level – if you have a straight piece of wood long enough, check the diagonals are level as well.
Sort out the Components for the Greenhouse
Now the fun begins. Sort out the pieces and try to decide what goes where. If there is another greenhouse near it can be useful to look closely at the parts as a comparison.
Now you will find that many of the nuts and bolts are missing and many of those you have a virtually unusable as they have oxidised and or the thread has stripped. Greenhouse nuts and bolts are fairly easy to find in the local DIY but, in hindsight, I know it is best to buy a load before you start.
A Warning about Building a Greenhouse
Especially with a larger greenhouse, it is a two-person job to get it erected. You are best starting early in the day and getting it constructed in one go. A finished frame is flimsy enough, half finished and a gust of wind will pull it apart and twist bars beyond use.
Check the weather forecast and make sure you have no strong winds predicted whilst you are building your greenhouse.
In my case we got half way and discovered a main strut was missing, so a further delay in the construction took place while I made a replacement as best I could from bits of another greenhouse frame.
Re-Glazing the Second Hand Greenhouse
Having finally got the frame up, the next job is to glaze the greenhouse. Start from the top because you can manoeuvre better without the glass in the frame below you. This is where you discover you are really short of glazing clips and many of those you have are twisted and unusable.
Finally, go to the glazier and buy the panes to replace those that were broken and that you have broken in glazing the house. Tip: glass does not bend.
Second Hand Greenhouse No 2
The second greenhouse was a six by eight donated by my neighbour and was much easier. I still had to construct a base for it, of course, but otherwise it was a doddle. First I removed the glass noting any non-standard panes and where they fitted.
At the plot I screwed the frame to the new base which was again made from sleepers laid onto the ground and then I re-glazed it.
Tips for re-building a Greenhouse
So, my conclusions and tips for buying a second hand greenhouse.
- Take the house down yourself; don’t buy one that has been taken down because you will not have a clue how to put it back together
- If you have a digital camera, take some photographs before taking the greenhouse down – these will help you when you re-assemble it.
- Take an indelible marker and mark major pieces – “Front Left Corner” etc
- Take WD40 or a penetrating oil to help with stuck nuts and bolts, a metal hacksaw may be needed for solidly rusted parts. Spanners and pliers as well.
- Take some good gloves – handling glass with bare hands is very risky.
- Before re-assembling the greenhouse, buy twice as many nuts and bolts as you think you will need and twice as many “W” glazing clips. Bet you still run out! My 8 foot by 6 foot greenhouse used 200 of those.
Be Safe!
Finally, again, take great care handling glass. Glass weakens with age and hairline cracks can cause a pane to break when you least expect. Work slow and safe.
Additional Greenhouse Parts
You will probably need to get additional parts to re-build a second hand greenhouse:
- Greenhouse Nuts & Bolts
- Cropped Head Nuts & Bolts
- W Clips
- Z Clips
- Glazing Strip
- Door Wheels
Greenhouse Growing, Coldframes etc. Further information
- Best Position for a Greenhouse – Where to Site a Greenhouse
- Understanding Greenhouse Planning Permission: What You Need to Know
- Wooden Greenhouses Compared to Aluminium
- Greenhouse Heating Guide – Various Types Reviewed
- Second Hand Greenhouse – Buying, Dismantling and Re-building a Greenhouse
- Greenhouses in High Winds – Protect and Survive!
- Greenhouse Accessories for Heating and Ventilation
- Fitting out the Greenhouse: Shelving, Staging & Greenhouse Benches
- Watering the Greenhouse – Equipment to Help Greenhouse Watering
- Portable Greenhouses – Patio Greenhouses and Allotment Greenhouses
- Managing the Hobby Greenhouse
- Cold Frames – Uses of Coldframes – Types of Coldframe
- How to Build a Cold Frame for Free!
- An Indoor Greenhouse – The Dewpoint Propagating & Growing Cabinet
- Choosing a Greenhouse – What Greenhouse to Buy

